W55MH32作为HTTP服务器
更新于 2026年9月16日
本篇总结
本例程在 W55MH32 上实现 HTTP 服务器,通过浏览器修改开发板的网络地址信息。
硬件平台:本例程基于 W55MH32L-EVB 开发板运行。
采购推荐:点击前往 WIZnet 官方淘宝店铺 选购 W55MH32L-EVB
本示例演示如何在 W55MH32 上通过 HTTP(超文本传输协议)实现 Web 服务器功能。开发板监听 80 端口,PC 浏览器访问其 IP 即可打开配置页面,提交表单后新参数写入 EEPROM 并重启生效。
前置工具准备
开始本例程前,请确认以下工具已安装:
- WIZ UartTool V1.0:串口调试工具:点击下载
HTTP 协议简介
HTTP(HyperText Transfer Protocol)是一种用于分布式、协作式、超媒体信息系统的应用层协议,基于 TCP/IP 通信协议来传递数据,是万维网数据通信的基础。它采用请求-响应模型:客户端发起请求,服务器处理后返回响应;本身无状态,每次请求独立。
HTTP 常用的请求方法有 GET 和 POST:
| 方法 | 参数位置 | 数据大小 | 安全性 | 典型用途 |
|---|---|---|---|---|
| GET | URL 查询字符串 | 受 URL 长度限制 | 明文显示,较低 | 获取资源 |
| POST | 请求体 | 无明显限制 | 相对安全 | 提交数据 |
GET 请求格式如下:
GET <Request-URI> HTTP/<Version>
<Headers>
<Blank Line>
POST 请求格式如下(多了一个 Body):
POST <Request-URI> HTTP/<Version>
<Headers>
<Blank Line>
<Body>
HTTP 响应由状态行、响应头和响应体三部分组成。状态码分五类:1xx 信息性、2xx 成功、3xx 重定向、4xx 客户端错误、5xx 服务器错误。一个简单的 HTML 页面示例:
<!DOCTYPE html>
<html lang="en">
<head>
<meta charset="UTF-8">
<meta name="viewport" content="width=device-width, initial-scale=1.0">
<title>Simple Page</title>
<style>
body { font-family: Arial, sans-serif; text-align: center; padding: 20px; }
button { padding: 10px 20px; cursor: pointer; }
</style>
</head>
<body>
<h1>Hello, Web!</h1>
<p>Click the button for a surprise.</p>
<button onclick="alert('You clicked the button!')">Click Me</button>
</body>
</html>
Web 页面交互中最常用的表单提交示例:
<form action="/submit" method="post">
<input type="text" name="username" placeholder="Enter your name">
<button type="submit">Submit</button>
</form>
AJAX 异步交互示例:
fetch('/api/data', {
method: 'GET'
})
.then(response => response.json())
.then(data => console.log(data));
W55MH32 的优势
W55MH32 SDK 内置了完整的 HTTP Server 库(httpServer.c/h),Socket 状态机、请求解析、响应发送全部由库函数处理。你只需要:注册网页内容 → 初始化 HTTP Server → 在主循环调用 httpServer_run()。CGI 回调函数处理 POST 提交的参数。
硬件连接与拓扑
请注意:
PC 和开发板需接入同一路由器(同一网段)。路由器需开启 DHCP 服务(家用路由器默认开启)。
- Micro USB 线连接 DEBUG USB 口到 PC(供电 + 调试串口)
- 网线连接开发板 RJ45 网口 到路由器 LAN 口
│ 路由器(DHCP Server) │
│ 192.168.1.1 │
└────┬──────────────────┬───────────┘
│ │
┌────┴──────────┐ ┌───┴───────────┐
│ W55MH32 │ │ PC │
│ (HTTP Server) │ │ (浏览器访问) │
│ :80 │ │ │
└───────────────┘ └───────────────┘
↑
DEBUG USB ──→ WIZ UartTool
工程结构
工程位于 SDK 内 1.SDK\ModuleDemo\WZTOE\3.HTTPServer\,核心文件如下:
3.HTTPServer/
├── Project/
│   └── Project.uvprojx       ← Keil 工程文件
└── USER/
    ├── main.c                ← 硬件初始化 + 网络配置 + HTTP Server 主循环
    ├── wiz_interface/
    │   ├── wiz_interface.c   ← PHY 检测 / 网络信息打印
    │   └── wiz_interface.h
    ├── httpServer/
    │   ├── httpServer.c      ← HTTP Server 状态机 / 网页内容定义
    │   ├── httpServer.h
    │   ├── httpUtil.c        ← CGI 请求处理(GET/POST 参数解析)
    │   └── httpUtil.h
    ├── eeprom/
    │   ├── eeprom.c          ← EEPROM 读写 / 网络配置持久化
    │   └── eeprom.h
    ├── uart/
    │   ├── bsp_uart.c        ← 调试串口 + printf 重定向
    │   └── bsp_uart.h
    ├── tim/
    │   └── bsp_tim.c/h       ← TIM3 1ms 定时器(供 HTTP/DHCP 超时)
    └── delay/
        └── delay.c/h          ← SysTick 毫秒延时
本例程相比 DHCP 章节的核心新增:HTTP Server 库的初始化、网页内容注册、CGI 回调处理以及 EEPROM 配置持久化。
步骤1:从 EEPROM 读取网络配置
文件:USER/main.c — 上电后首先检查 EEPROM 中是否有已保存的网络配置,有则加载,无则使用默认值。然后调用 network_init() 完成网络初始化(含 DHCP)。
check_eeprom_network_info(&default_net_info);
network_init(ethernet_buf, &default_net_info);
check_eeprom_network_info() 函数的作用是检查 EEPROM 中是否有网络地址信息,如果有则赋值给 default_net_info 结构体。函数内容如下:
uint8_t check_eeprom_network_info(wiz_NetInfo *net_info)
{
  wiz_NetInfo eeprom_net_info = {0};
  /*-----------------------------------------------------------------------------------*/
  if (ee_CheckDevice(EEPROM_DEV_ADDR) == 1)
  {
      /* No EEPROM detected */
      printf("No serial EEPROM detected!\r\n");
      return 0;
  }
  ee_ReadBytes((uint8_t *)&eeprom_net_info, 0, sizeof(eeprom_net_info));
  if (eeprom_net_info.mac[0] == 0x00 && eeprom_net_info.mac[1] == 0x08 && eeprom_net_info.mac[2] == 0xdc)
  {
      memcpy(net_info, &eeprom_net_info, sizeof(wiz_NetInfo));
      return 1;
  }
  return 0;
}
关键点:通过检查 MAC 地址前三字节(00:08:DC)判断 EEPROM 中是否存有有效配置。匹配则加载,否则返回 0 使用默认值。
步骤2:注册网页内容并初始化 HTTP Server
文件:USER/httpServer/httpServer.c + USER/main.c — 首先定义配置页面和配置成功页面的 HTML 内容,然后将网络信息格式化填充到页面模板中,最后注册网页内容并初始化 HTTP Server。
2.1 配置页面(index_page)
该页面包含一个 POST 表单,提交地址为 config.cgi,带有 JavaScript 表单验证功能。
#define index_page "<html>\n" \
"<head>\n" \
"    <title>W55MH32 Configuration Page</title>\n" \
"    <style>\n" \
"        body { font-family: Arial, sans-serif; margin: 20px; padding: 20px; background-color: #f4f4f9; }\n" \
"        h1 { text-align: center; color: #333; }\n" \
"        form { max-width: 400px; margin: auto; background: #ffffff; padding: 20px; border-radius: 8px; box-shadow: 0 0 10px rgba(0, 0, 0, 0.1); }\n" \
"        label { display: block; margin-bottom: 8px; font-weight: bold; }\n" \
"        input[type=text], input[type=submit] { width: 400px; padding: 8px; margin-bottom: 12px; border: 1px solid #ccc; border-radius: 4px; }\n" \
"        input[type=submit] { background-color: #4CAF50; color: white; border: none; cursor: pointer; }\n" \
"        input[type=submit]:hover { background-color: #45a049; }\n" \
"        input[readonly] { background-color: #e9ecef; color: #6c757d; border: 1px solid #ced4da; cursor: not-allowed; }\n" \
"        .error { color: red; font-size: 12px; margin-top: -10px; margin-bottom: 10px; }\n" \
"        input::placeholder { color: #aaa; font-style: italic; }\n" \
"    </style>\n" \
"    <script>\n" \
"        function validateForm(event) {\n" \
"            const ipPattern = /^(\\d{1,3}\\.){3}\\d{1,3}$/;\n" \
"            let isValid = true;\n" \
"            document.querySelectorAll('.error').forEach(e => e.textContent = '');\n" \
"            const fields = ['ip', 'subnet', 'gateway', 'dns'];\n" \
"            fields.forEach(field => {\n" \
"                const input = document.forms[0][field];\n" \
"                if (input.value.trim() === '') {\n" \
"                    input.placeholder = 'e.g., 192.168.1.1';\n" \
"                    document.getElementById(field + '-error').textContent = 'This field is required.';\n" \
"                    isValid = false;\n" \
"                } else if (!ipPattern.test(input.value)) {\n" \
"                    document.getElementById(field + '-error').textContent = 'Invalid IP address format.';\n" \
"                    isValid = false;\n" \
"                }\n" \
"            });\n" \
"            if (!isValid) { event.preventDefault(); }\n" \
"        }\n" \
"    </script>\n" \
"</head>\n" \
"<body>\n" \
"    <h1>W55MH32 Configuration Page</h1>\n" \
"    <form method=\"post\" action=\"config.cgi\" onsubmit=\"validateForm(event)\">\n" \
"        <label>MAC Address: </label><input type=\"text\" value=\"%s\" readonly><br>\n" \
"        <label>IP Address: </label><input type=\"text\" name=\"ip\" placeholder=\"e.g., 192.168.1.1\" value=\"%s\"><div id=\"ip-error\" class=\"error\"></div><br>\n" \
"        <label>Subnet Mask: </label><input type=\"text\" name=\"subnet\" placeholder=\"e.g., 255.255.255.0\" value=\"%s\"><div id=\"subnet-error\" class=\"error\"></div><br>\n" \
"        <label>Default Gateway: </label><input type=\"text\" name=\"gateway\" placeholder=\"e.g., 192.168.1.1\" value=\"%s\"><div id=\"gateway-error\" class=\"error\"></div><br>\n" \
"        <label>DNS Server: </label><input type=\"text\" name=\"dns\" placeholder=\"e.g., 8.8.8.8\" value=\"%s\"><div id=\"dns-error\" class=\"error\"></div><br>\n" \
"        <input type=\"submit\" value=\"Submit\">\n" \
"    </form>\n" \
"</body>\n" \
"</html>\n"
2.2 配置成功页面(CONFIG_SUCCESS_PAGE)
提交成功后显示的页面,带有 10 秒倒计时自动跳转到新 IP 地址。
#define CONFIG_SUCCESS_PAGE \
"<!DOCTYPE html>\n" \
"<html lang=\"en\">\n" \
"<head>\n" \
"    <meta charset=\"UTF-8\">\n" \
"    <meta name=\"viewport\" content=\"width=device-width, initial-scale=1.0\">\n" \
"    <title>Configuration Modification Succeeded</title>\n" \
"    <style>\n" \
"        body { font-family: Arial, sans-serif; text-align: center; padding-top: 100px; background-color: #f0f0f0; }\n" \
"        h1 { color: green; animation: fadeInOut 2s infinite; }\n" \
"        #countdown { font-size: 24px; margin-top: 20px; opacity: 0; animation: fadeIn 1s forwards; animation-delay: 1s; }\n" \
"        @keyframes fadeIn { from { opacity: 0; } to { opacity: 1; } }\n" \
"    </style>\n" \
"</head>\n" \
"<body>\n" \
"    <h1>Configuration Modification Succeeded!</h1>\n" \
"    <p id=\"countdown\">Will redirect in 10 seconds. Please wait...</p>\n" \
"    <script>\n" \
"        let seconds = 10;\n" \
"        const countdownElement = document.getElementById('countdown');\n" \
"        const countdownInterval = setInterval(() => {\n" \
"            seconds--;\n" \
"            countdownElement.textContent = `Will redirect in ${seconds} seconds. Please wait...`;\n" \
"            if (seconds === 0) {\n" \
"                clearInterval(countdownInterval);\n" \
"                window.location.href = 'http://%d.%d.%d.%d/';\n" \
"            }\n" \
"        }, 1000);\n" \
"    </script>\n" \
"</body>\n" \
"</html>"
2.3 格式化页面并初始化
文件:USER/main.c — 将网络信息格式化为字符串,通过 sprintf 填充到 index_page 模板中的 %s 占位符,然后注册网页内容并初始化 HTTP Server。
printf("Please enter %d.%d.%d.%d in your browser to access the %s HTTP server\r\n",
       net_info.ip[0], net_info.ip[1], net_info.ip[2], net_info.ip[3], _WIZCHIP_ID_);
sprintf(mac, "%02X:%02X:%02X:%02X:%02X:%02X",
        net_info.mac[0], net_info.mac[1], net_info.mac[2],
        net_info.mac[3], net_info.mac[4], net_info.mac[5]);
sprintf(ip,  "%d.%d.%d.%d", net_info.ip[0], net_info.ip[1], net_info.ip[2], net_info.ip[3]);
sprintf(sn,  "%d.%d.%d.%d", net_info.sn[0], net_info.sn[1], net_info.sn[2], net_info.sn[3]);
sprintf(gw,  "%d.%d.%d.%d", net_info.gw[0], net_info.gw[1], net_info.gw[2], net_info.gw[3]);
sprintf(dns, "%d.%d.%d.%d", net_info.dns[0], net_info.dns[1], net_info.dns[2], net_info.dns[3]);
sprintf(page, (char *)index_page, mac, ip, sn, gw, dns);
reg_httpServer_webContent((uint8_t *)"index.html", (uint8_t *)page);         // 注册web内容
httpServer_init(http_tx_ethernet_buf, http_rx_ethernet_buf, 1, socknumlist); // 初始化HTTP Server
reg_httpServer_webContent() 注册 web 内容(HTML 页面或 JavaScript)。httpServer_init() 的四个参数分别是 HTTP 发送缓存、HTTP 接收缓存、使用的 SOCKET 数量以及对应的 SOCKET 列表。
步骤3:注册 HTTP 超时中断
文件:USER/tim/bsp_tim.c — HTTP Server 的超时判断需要一个 1 秒的累加计时器。在 TIM3 的 1ms 中断中累加,满 1 秒后同时调用 DHCP 和 HTTP Server 的超时处理函数。
/**
* @brief   1ms timer IRQ Handler
* @param   none
* @return  none
*/
void TIM3_IRQHandler(void)
{
  static uint32_t tim3_1ms_count = 0;
  if (TIM_GetITStatus(TIM3, TIM_IT_Update) != RESET)
  {
      tim3_1ms_count++;
      if (tim3_1ms_count >= 1000)
      {
          DHCP_time_handler();
          httpServer_time_handler();
          tim3_1ms_count = 0;
      }
      TIM_ClearITPendingBit(TIM3, TIM_IT_Update);
  }
}
步骤4:运行 HTTP Server
文件:USER/main.c — 在主循环中调用 httpServer_run() 驱动状态机。
while (1)
{
    httpServer_run(SOCKET_ID);
}
httpServer_run() 的逻辑跟 TCP Server 基本一致,运行一个状态机,根据 SOCKET 不同状态执行相应的 HTTP Server 处理:
void httpServer_run(uint8_t seqnum)
{
  uint8_t  s; // socket number
  uint16_t len;
  uint32_t gettime = 0;
#ifdef _HTTPSERVER_DEBUG_
  uint8_t destip[4] = { 0, };
  uint16_t destport = 0;
#endif
  http_request        = (st_http_request *)pHTTP_RX; // HTTP Request 结构体
  parsed_http_request = (st_http_request *)pHTTP_TX;
  // 获取 H/W socket number
  s = getHTTPSocketNum(seqnum);
  /* HTTP Service Start */
  switch (getSn_SR(s))
  {
  case SOCK_ESTABLISHED:
      // 中断清除
      if (getSn_IR(s) & Sn_IR_CON)
      {
          setSn_IR(s, Sn_IR_CON);
      }
      // HTTP 处理状态
      switch (HTTPSock_Status[seqnum].sock_status)
      {
      case STATE_HTTP_IDLE:
          if ((len = getSn_RX_RSR(s)) > 0)
          {
              if (len > DATA_BUF_SIZE) len = DATA_BUF_SIZE;
              len = recv(s, (uint8_t *)http_request, len);
              *(((uint8_t *)http_request) + len) = '\0';
              parse_http_request(parsed_http_request, (uint8_t *)http_request);
              // HTTP 'response' handler
              http_process_handler(s, parsed_http_request);
              gettime = get_httpServer_timecount();
              // 检查 TX socket buffer 是否发送完毕
              while (getSn_TX_FSR(s) != (getSn_TxMAX(s)))
              {
                  if ((get_httpServer_timecount() - gettime) > 3)
                  {
                      break;
                  }
              }
              if (HTTPSock_Status[seqnum].file_len > 0)
                  HTTPSock_Status[seqnum].sock_status = STATE_HTTP_RES_INPROC;
              else
                  HTTPSock_Status[seqnum].sock_status = STATE_HTTP_RES_DONE;
          }
          break;
      case STATE_HTTP_RES_INPROC:
          // 重复发送剩余的 HTTP 响应数据
          send_http_response_body(s, 0, http_response, 0, 0);
          if (HTTPSock_Status[seqnum].file_len == 0)
              HTTPSock_Status[seqnum].sock_status = STATE_HTTP_RES_DONE;
          break;
      case STATE_HTTP_RES_DONE:
          // Socket file info 结构体重新初始化
          HTTPSock_Status[seqnum].file_len    = 0;
          HTTPSock_Status[seqnum].file_offset = 0;
          HTTPSock_Status[seqnum].file_start  = 0;
          HTTPSock_Status[seqnum].sock_status = STATE_HTTP_IDLE;
          http_disconnect(s);
          break;
      default:
          break;
      }
      break;
  case SOCK_CLOSE_WAIT:
      disconnect(s);
      break;
  case SOCK_CLOSED:
      if (reboot_flag)
      {
          NVIC_SystemReset();
      }
      if (socket(s, Sn_MR_TCP, HTTP_SERVER_PORT, 0x00) == s) /* 重新初始化 socket */
      {
      }
      break;
  case SOCK_INIT:
      listen(s);
      break;
  case SOCK_LISTEN:
      break;
  default:
      break;
  } // end of switch
}
状态机说明
- SOCK_LISTEN → 等待客户端连接
- SOCK_ESTABLISHED → 收到请求后解析并处理响应(IDLE → RES_INPROC → RES_DONE)
- SOCK_CLOSED → 检查 reboot_flag 决定是否重启,然后重新打开 Socket 监听
步骤5:CGI 请求处理
文件:USER/httpServer/httpUtil.c — POST 方式的 CGI 请求在 predefined_set_cgi_processor() 函数中处理。当 URI 为 config.cgi 时,解析表单参数、更新网络配置、写入 EEPROM 并设置重启标志。
uint8_t predefined_set_cgi_processor(uint8_t *uri_name, uint8_t *uri, uint8_t *buf, uint16_t *len)
{
  if (strcmp((const char *)uri_name, "config.cgi") == 0)
  {
      uint8_t    *param;
      wiz_NetInfo new_net_info = {0};
      wizchip_getnetinfo(&new_net_info);
      param = get_http_param_value((char *)uri, "ip");        // 获取IP地址
      parse_ip((char *)param, new_net_info.ip);               // 更新IP地址
      param = get_http_param_value((char *)uri, "subnet");    // 获取子网掩码
      parse_ip((char *)param, new_net_info.sn);               // 更新子网掩码
      param = get_http_param_value((char *)uri, "gateway");   // 获取默认网关
      parse_ip((char *)param, new_net_info.gw);               // 更新默认网关
      param = get_http_param_value((char *)uri, "dns");       // 获取DNS地址
      parse_ip((char *)param, new_net_info.dns);              // 更新DNS地址
      new_net_info.dhcp = NETINFO_STATIC;
      ee_WriteBytes((uint8_t *)&new_net_info, 0, sizeof(wiz_NetInfo));
      reboot_flag = 1;
      *len = sprintf((char *)buf, (char *)CONFIG_SUCCESS_PAGE,
                     new_net_info.ip[0], new_net_info.ip[1],
                     new_net_info.ip[2], new_net_info.ip[3]);
      return 1;
  }
  return 0;
}
处理流程
get_http_param_value() 从 POST 请求体中提取参数值,parse_ip() 将字符串转换为 IP 数组。新配置写入 EEPROM 后设置 reboot_flag = 1,同时返回 CONFIG_SUCCESS_PAGE 作为响应体(包含新 IP 用于倒计时跳转)。
步骤6:重启设备应用新配置
在 httpServer_run() 函数中,当 SOCKET 处于 SOCK_CLOSED 状态时(即上次请求已处理完毕),再进行复位操作,避免客户端请求后 W55MH32 未响应就重启导致超时。
case SOCK_CLOSED:
    if (reboot_flag)
    {
        NVIC_SystemReset();
    }
为什么选在 SOCK_CLOSED 重启
如果在响应尚未发送完毕时立即重启,客户端会因连接异常断开而出现请求超时。选择在 SOCK_CLOSED 状态复位,意味着本次 HTTP 请求-响应周期已完全结束,连接已正常关闭,此时重启不会影响客户端体验,浏览器还能根据配置成功页面的倒计时自动跳转到新地址。
运行验证
烧录例程运行后,首先进行 PHY 链路检测,然后通过 DHCP 获取网络地址并打印,最后 HTTP Server 开始监听。打开 WIZ UartTool V1.0,连接 DEBUG USB 对应 COM 口(115200 / 8N1),预期串口输出如下:
W55MH32 HTTP Server example
PHY link
The current Mbtis speed : 100Mbps
The current Duplex Mode : Full-Duplex
DHCP running
DHCP success!
====================================================================================================
 W55MH32 network configuration : DHCP

 MAC         : 00:08:DC:00:0E:9A
 IP          : 192.168.1.6
 Subnet Mask : 255.255.255.0
 Gateway     : 192.168.1.1
 DNS         : 192.168.1.1
====================================================================================================

Please enter 192. 168. 1. 6 in your browser to access the W55MH32 HTTP server
> HTTPSocket[0] : CLOSED
> HTTPSocket[0] : OPEN
请注意
测试实例需要 PC 端和 W55MH32 处于同一网段。
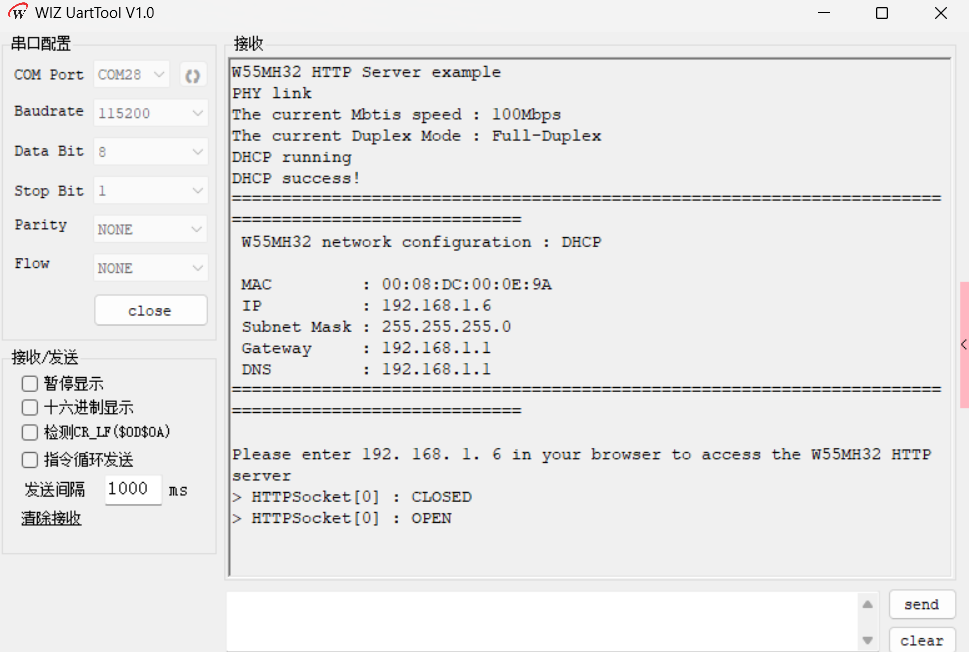
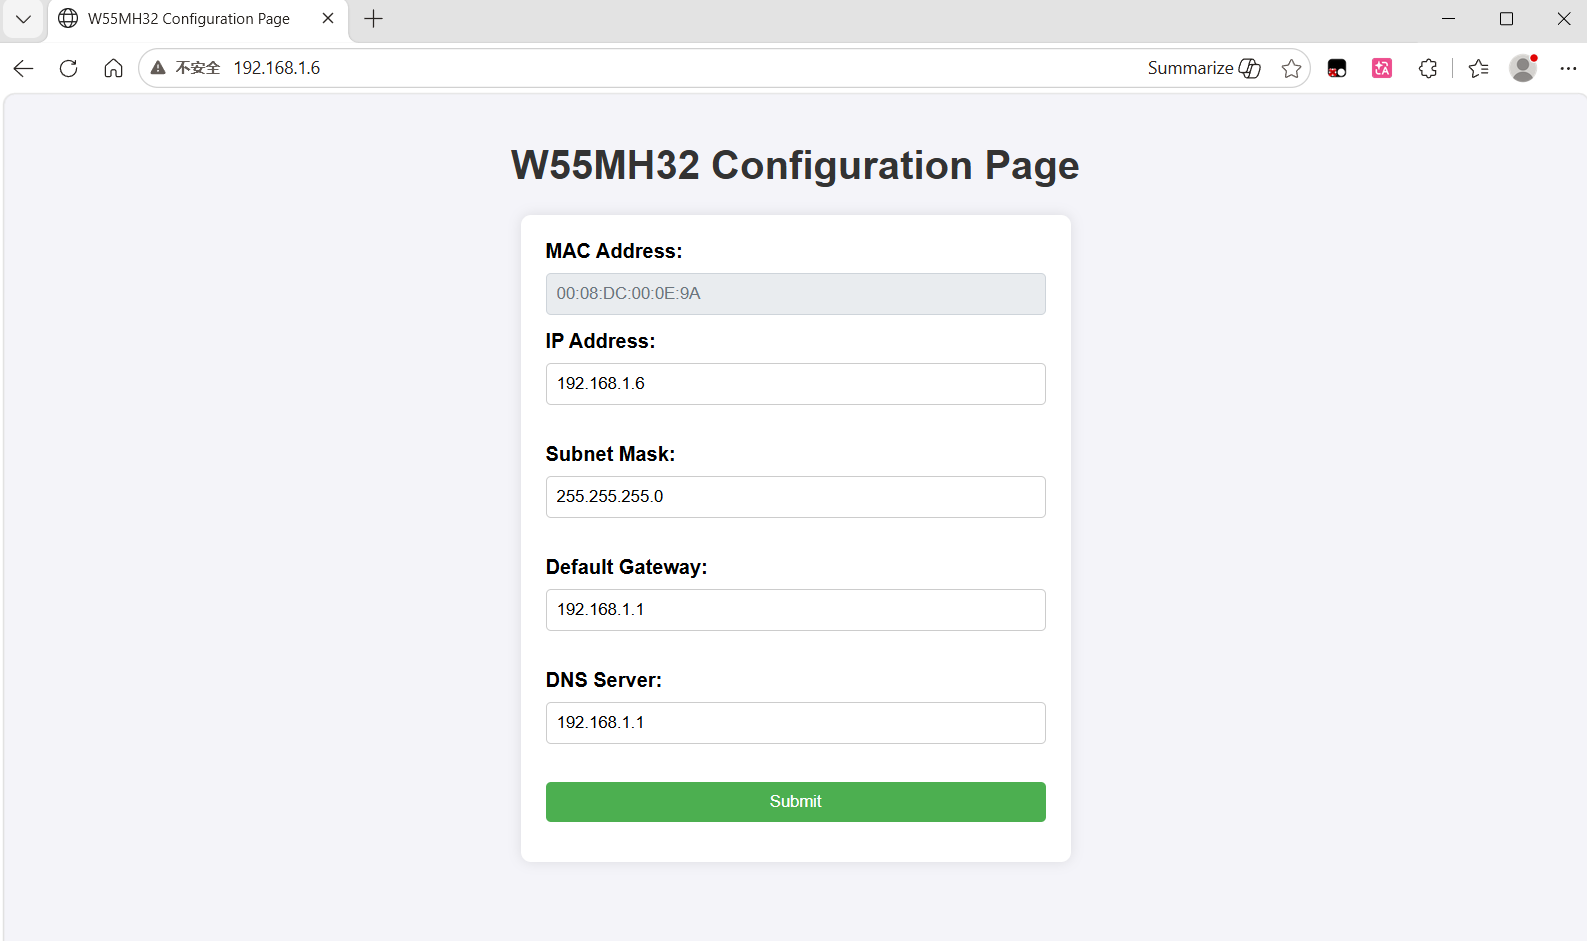
打开浏览器,输入 W55MH32 的 IP 地址(如 192.168.1.6)进行访问,即可看到配置页面。
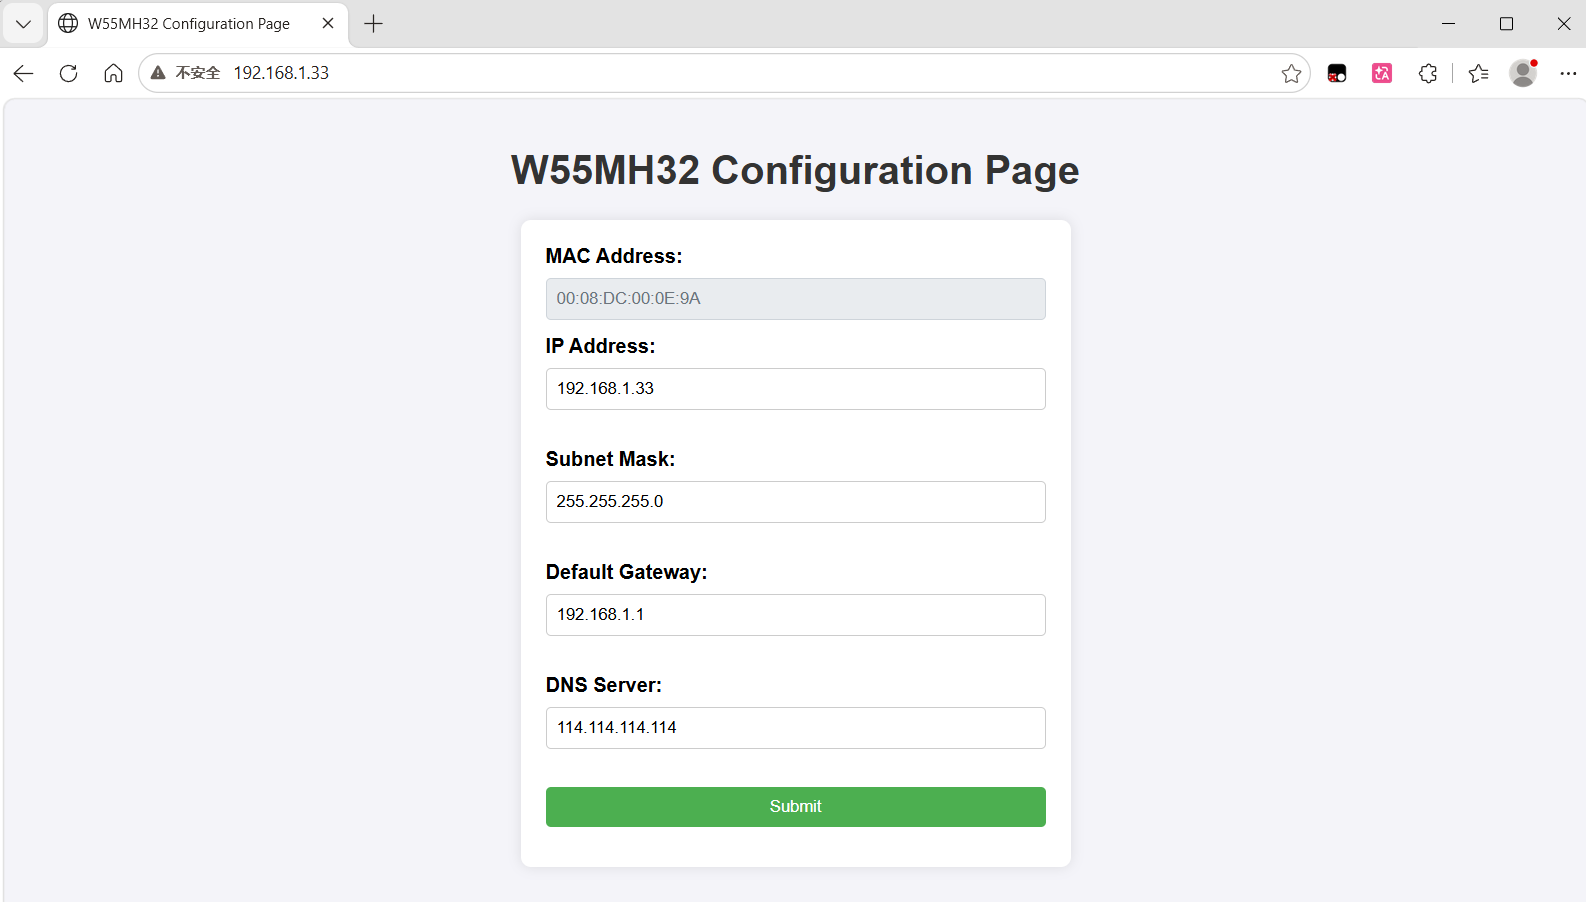
将 IP 地址改为 192.168.1.33,DNS 改为 114.114.114.114,点击 Submit 按钮。等待 W55MH32 重启后,浏览器会自动跳转至新地址。
常见问题
Q: HTTP 协议的无状态性是什么意思
HTTP 本身不保存请求之间的状态,每次请求都是独立的,服务器不会记录上一次请求的信息。如果需要保持状态(如用户登录),可以通过 Cookie、Session 等机制实现。W55MH32 作为 HTTP Server 时,每次请求处理完毕后即断开连接。
Q: GET 和 POST 方法如何选择
GET 用于从服务器获取资源,参数通过 URL 查询字符串传递,长度受限且明文显示,不适合敏感信息。POST 用于向服务器提交数据,数据放在请求体中,体积无明显限制且相对安全。本例程中修改网络配置使用 POST 方式提交到 config.cgi,避免参数暴露在 URL 中。
Q: 修改网络配置后为什么要重启设备
网络地址信息写入 EEPROM 后,需要重新初始化网络协议栈才能使新配置生效。本例程通过设置 reboot_flag 标志位,在 httpServer_run() 检测到 SOCK_CLOSED 状态(即上一次请求处理完毕)时调用 NVIC_SystemReset() 复位设备,避免客户端请求未响应就重启导致超时。
Q: 为什么重启时机要选在 SOCK_CLOSED 状态
如果在响应尚未发送完毕时立即重启,客户端会因连接异常断开而出现请求超时。选择在 SOCK_CLOSED 状态复位,意味着本次 HTTP 请求-响应周期已完全结束,连接已正常关闭,此时重启不会影响客户端体验,浏览器还能根据配置成功页面的倒计时自动跳转到新地址。
Q: httpServer_init 的四个参数分别是什么
四个参数依次为:HTTP 发送缓存(http_tx_ethernet_buf)、HTTP 接收缓存(http_rx_ethernet_buf)、使用的 SOCKET 数量(如 1)、以及对应的 SOCKET 列表(socknumlist)。注册网页内容则通过 reg_httpServer_webContent() 完成,可以是 HTML 页面或 JavaScript 代码。
总结
本文实现了 W55MH32 通过 HTTP Server 修改网络配置的完整流程:
- 协议基础:HTTP 是基于 TCP/IP 的应用层协议,采用请求-响应模型,具有无状态、无连接的特点
- 请求方法:GET 用于获取资源(参数在 URL),POST 用于提交数据(参数在请求体),本例程使用 POST 修改网络配置
- 响应结构:响应由状态行、响应头、响应体三部分组成,响应头与响应体之间用空行分隔
- 实现步骤:EEPROM 读取配置 → 注册网页与初始化 HTTP Server → 注册超时中断 → 运行状态机 → CGI 处理 POST 提交 → 重启生效
- 配置持久化:新网络参数写入 EEPROM,重启后通过 check_eeprom_network_info() 读取,实现断电不丢失
- 安全重启:在 SOCK_CLOSED 状态复位设备,确保响应发送完毕,浏览器可自动跳转新地址